How to Take a Screenshot on PC with ‘Windows + Print Screen’ Shortcut
The first, and probably the most widely used, way you can take screenshots on your PC is by using the ‘Windows + Print Screen’ shortcut. In order to take a screenshot using this method, all you need to do is tap on the Windows key and the Print Screen key (often labeled as PrtScr or PrtScn) on your keyboard at the same time and you’ll see the screen dim momentarily and brighten back up signifying a successful screen grab. This is, by far, the simplest and the fastest way to take a screenshot on a Windows 10 PC.
Note: In some laptops the Print Screen button can only be activated after pressing the Function key. If you have such a laptop then you’ll have to use the ‘Windows + Function (Fn) + Print Screen’ command to take a screenshot. Another thing worth noting is that you can take a screenshot by just pressing the ‘Print Screen’ key, but the screenshot taken using this method is saved to the Windows clipboard and you’ll need to first paste it in Paint/Paint 3D before you can save it.
=============================
How to Take a Screenshot on PC with the ‘Windows + Shift + s’ Shortcut
Another great shortcut that you can use to take screenshots on your Windows 10 PC is the ‘Windows + Shift + s’ command. You can use the command by tapping on the Windows, Shift and s key on your keyboard at the same time which will then allow you to drag and select any portion of the screen that you want to take a screenshot of. However, unlike the previous methods, the screenshot captured by this method isn’t saved automatically.
Screenshots captured by this method are copied to the Windows clipboard and need to be pasted in an image processing software like Paint or Paint 3D. To do that, you’ll need to open up Paint and press ‘Ctrl+V’ to paste the screenshot and then you’ll be able to edit/save the screenshot. The ‘Windows + Shift + s’ command is a faster alternative to the Snipping Tool as it removes one step from the process of taking a screenshot.
=============================
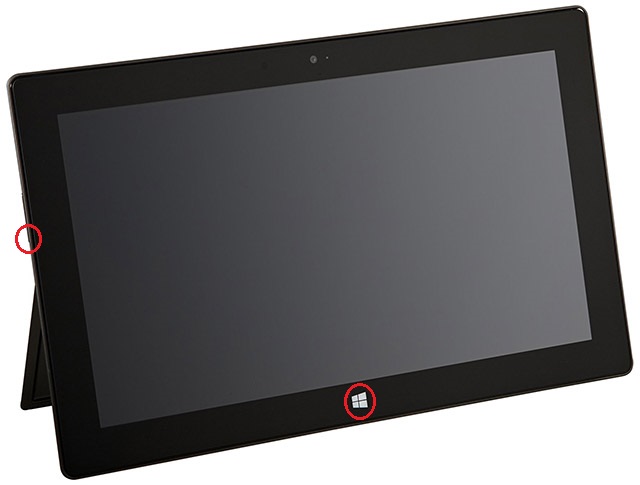
In case you have a Microsoft Surface tablet, then you might not have access to a physical keyboard. In such a situation, you’ll need to hold the Windows logo and the volume down button at the same time to take a screenshot. Upon pressing the buttons, the screen will get darker momentarily, signaling that a screenshot has been taken. The captured screenshots will be stores within the Pictures library in a folder titled Screenshots.
Some of the aforementioned screenshot tools automatically save the captured screenshot in the Screenshot folder within the Pictures library. In case you don’t want to save the Screenshots you take in that folder, you can change the default screenshot destination by following these steps:
- Locate the Screenshots folder in the Pictures library on your system
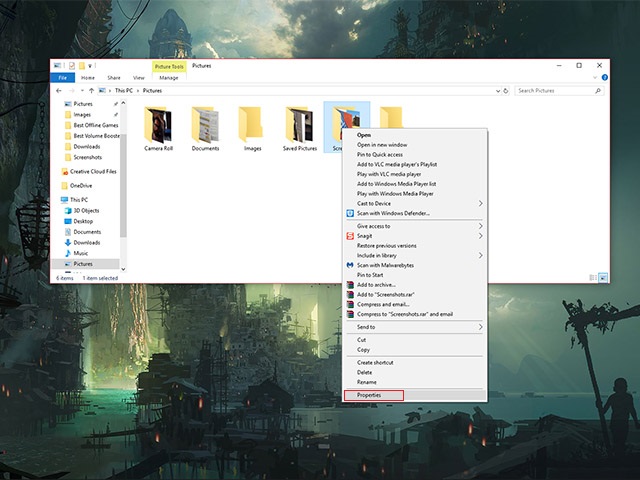
- Right click on the Screenshots folder and select Properties from the drop down menu
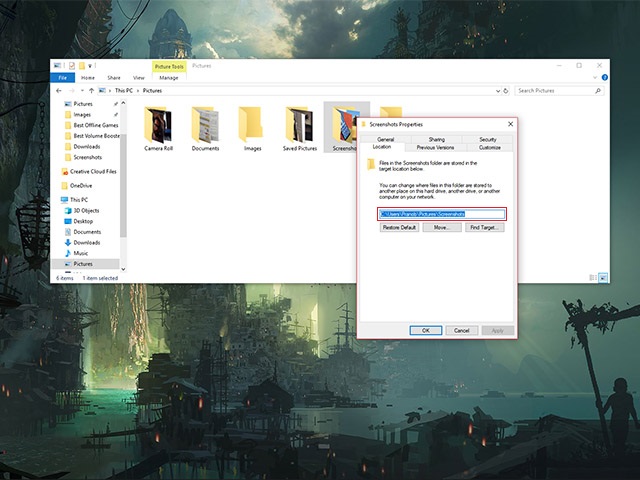
- Switch to the Location tab and enter the new destination in the address bar within the tab
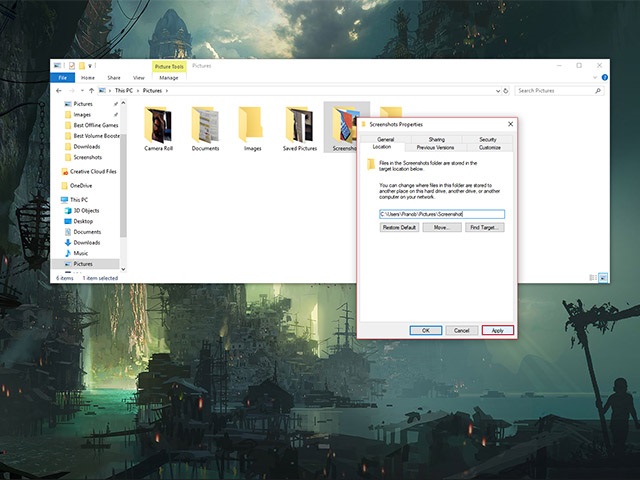
- Click on the Apply button on the bottom right corner of the window
Your Screenshots will now be stored in the new location that you entered in the address bar. If you wish to revert back any changes to the location, you can navigate to the same window and click on the Restore Defaults button.
How to Change the Default File Format for Screenshots in Windows
Screenshots captured in Windows are saved in the .png file format by default, but if you prefer working with any other file format there are a couple of ways you can save your screenshots in other file formats. While Windows doesn’t have a native feature which will allow you to change the default file format of your screenshots, you can manually choose a different file format every time you take a screenshot.
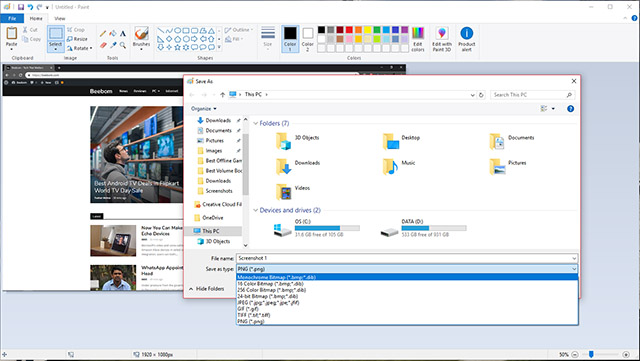
The feature will only work with the screenshot tools that require you to save the screenshots manually and won’t work with the ‘Windows + PrtScr’ command that takes and saves screenshots automatically. All you need to do is switch the file format by tapping on the drop down menu right below the file name bar in the ‘Save As’ dialog and select any of the other available file formats.


No comments:
Post a Comment